Hardwood Floor Installation – Step-by-Step
To truly get an understanding of the full process of installing custom hardwood floors, we recommend you first watch this video. It provides a thorough description of the processes involved. Following this video you can then review the individual steps using the tabs below.
Introduction
 My name is David Snell and I own DFW Custom Wood Floors. We specialize in installing site finished hand-scraped wood floors, flat natural wood floors and re-finishing existing hardwood floors. DFW Custom Wood Floors is a company that I founded based on my love for the site finished hand-scraped hardwood floors I started seeing several years back in newer up-scale DFW homes! Most of you are familiar with or have seen the very rustic looking ever so popular custom hand-scraped wood floors I am referring to! The following pages of information were written to inform you of several basic considerations we think you should consider before selecting a vendor to install any custom wood floor option in your home or office. Please take the time to educate yourself prior to selecting a vendor for this unique flooring option! Numerous nightmare stories can be found. Hopefully all prevented if you do your homework before selecting a custom wood floor vendor.
We “hope” that after reading the following pages of information you will select DFW Custom Wood Floors to submit a personal bid and then start construction on your own hand-scraped wood floor(s). Please consider the following pages of information as a “User’s Reference Guide” to the entire selection of how to chose a vendor and why you may desire this unique and beautiful form of flooring over so many other options!
Regardless of if you contract with us for a new floor or just to re-finish your old one, we hope that the following information offered will enable you to make a solid decision when selecting a company you can trust this huge investment to! DFW Custom Wood Floors and I recognize that any flooring addition to a new or used home is quite an investment. We hope that we can be of a help to you!
Where Our Information Came From
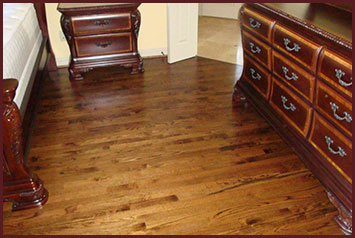
 I thought it would be nice to share some of what I learned regarding do’s/don’ts when considering this decision and how to select a vendor! Most of the information I obtained came through numerous calls to various flooring companies and then finally to a few builders who sub the (hand scraped wood floor) work out in most cases. In my home, I went from a short Berber to the very rustic looking red oak hand-scraped board on board floors in most of my house. The change of interior appearance where the hand scraped wood floors were installed was vast! Sometimes referred to as “site finished” (meaning the flooring was basically hand crafted and finished ON site), you will have a one of a kind floor once completed as NO TWO scraped wood floors will be the exact same! I hope the following information may help you in selecting a reputable vendor when considering hand scraped-wood flooring in your home!
The following is a semi “step-by-step” guide that may help you when considering how to go about selecting a reputable installer and reasons why you might select hand scraped wood floors over other numerous flooring options!
Why Hand Scraped Wood vs. Others
 1. Why did I select hand scraped wood floors over carpet/tile/pre-treated/finished wood planks when hand scraped wood floors are “typically” one of the more expensive flooring options?
Key is they do not have to be!
Two reasons:
First, my objective was to have a low maintenance floor that would eliminate expensive and repetitive carpet replacement with occasional pet accidents from one of my oldest dogs. Hand scraped wood flooring was one of the few flooring options in which I was able to have the entire wood surface coated with a wood sealing polyurethane coat. While tile was an option, I was concerned about re-selling my house and the possibility of cold floors associated with tile/marble in the Fall and Winter months.
Second, hand scraped wood floors are part of a growing stylish trend found in MOST new high end designer homes where re-sale value is almost assured to go up once this type of flooring is installed.
If you were to walk in most new high end homes, hand scraped wood floors are typically what you will find! Regardless of the very rich look it adds to any room where hand scraped wood floors are installed, I was trying to find the most versatile flooring replacement to aid in my war against one of my older dog’s occasional pet accidents. So why not install much less expensive pre finished wood flooring?
Most pre-treated/finished wood floor installations are not able to be sealed with a topical coating such as the polyurethane once the wood planks are installed. My hand scraped wood floors were able to be scraped and then stained to my liking. Wood installed in a hand scraped installation is “scraped” on site and is able to be stained to your liking and then coated/sealed with up to three coats of polyurethane. Therefore creating a virtually leak proof easy to clean alternative to many other flooring options I researched.
Cost Factors
 Now comes the cost factor which was most certainly worthy of consideration and research before electing to make these major changes in my home. I learned through extensive research that many new home builders and flooring companies sub-contract the hand scraped wood floor work out to companies other than their own. Thus they simply serve as the middle man offering rates as high as $12-$13 plus a square foot!! How ever, once the “middle man” can be taken out of the equation I assure you there are resources that offer the same beautiful hand scraped wood floor installations as much as 30-40% less than if you contracted your floor out to say a Home Depot. I know as I was quoted $12.50 a square foot by a local Home Depot but had my floors done to my own specifications for around $9.50 a square foot.
I eliminated the “middle-man” and now hope to share the great work my crew did for me and my dogs! With all of that said lets move on to the many considerations there are to look at on various methods of installation. Basically you can go one of two ways when considering how you want your hand scraped floors to be installed. Let me explain!
Glue Down Versus Board On Board
 First, some tried to sell me on “gluing” the wood planks to my foundation while a few others tried to highlight the benefits of going with board on board.
In Texas, we have ever-changing soil conditions which can reek havoc on our foundations. Once your carpet is removed it is more than likely that you will see small to large cracks throughout the exposed foundation areas. My house is only 5 years old and I was surprised to see the number of cracks (although small) in my cement slab! These cracks are a great way for moisture to seep into your home and potentially create damage if a moisture barrier is NOT considered when installing a hand scraped hard wood floor. In my opinion after research I conducted through numerous calls to flooring companies, GLUE IS NOT what I would suggest if you are to make this long lasting investment. Glue is a minimal foundation sealer.
It has been rumored that the probability of boards “popping” with a glued down application is much more probable over a shorter period of time than if the wood floor is actually “nailed down” to a foundation covering additional layer of 5/8th’s inch plywood. This is what is called “board on board”. Some companies TRIED TO SELL ME on the glue down method as obviously it is less expensive and time consuming for them although many of their bids were still in the $11 to $12 dollar a square foot range.
Once again, when the “middle man” can be eliminated you too can have a (board on board) application with TWO MORE ADDITIONAL MOISTURE protecting aids installed. All this prior to your wood planks being installed for around $9-$10 a square foot. After listening to several companies explain their installation methods I was sold that the only way I was going to go was with the (board on board) build regardless of who I selected! In conclusion its time to take a look at what my contractor did for me on my hand scraped hard wood floor installation!
Carpet Removal and Foundation Prep
Old Carpet Removal
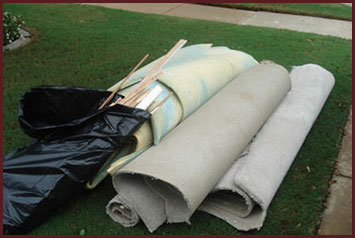 1. They removed my old carpet and padding as well as took it with them when they left for a very nominal fee. THIS REMOVAL FEE MAY BE NEGOTIATED OR EVEN WAIVED if you elect to have the hand scraped wood floors installed!! My base boards were also removed at this point as the new floor will have a new vertical height since there are two layers of wood above the foundation. The majority of older baseboards will crack when removed so be prepared to replace your base boards which are NOT very expensive.My crew cut and re-installed the new base boards I found at Loews once the floor was completed! As for painting, they do not paint! I again went direct to a lead I found and I paid under $200 to have the new base boards painted and re-caulked to the walls where the new floors were installed. I have this point of contact I will be happy to offer.
Baseboard Removal
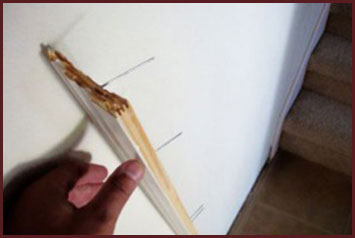 2. 9 times out of 10 your old base boards will not come off the wall in one piece. Why you ask? Look at the pictures we have provided to show how long the nails/staples are that most builders installed your base boards with. They use a good number of these nails and they are very long. Base Boards, if even made of real wood, are quite fragile. We suggest replacing the base boards in most installations, unless they are taller base boards, to shoe molding or quarter round molding. They may be used to close gaps where new floors will run up against existing base boards. Saving “old base boards” can end up costing your more than simply buying new ones. By the time you pay labor rates to remove the old ones, then clean old caulking off and reinstall and re-paint etc., new is typically best way to go! Base Board cost is not part of our per square foot charges! We are happy to set up our trim contractors to give you a bid in any situation you may desire. Painting and caulking of the base boards can be contracted through our trim carpenters also so we can offer you a turn key hassle free process from start to finish.
If you have the taller thicker bases boards they may survive being pulled off the wall. OR you may elect to leave them in place and use the small quarter round molding to seal the gap between the new floor planks that rest against the bottom of your base boards.
We can show you pictures both ways or send you to homes to view that have gone both ways!
Foundation Sealant
 3. They treated several areas of my foundation with a topical sealant where I feared pet urine may have penetrated the carpet/padding and soaked in to the foundation. I did not want any possible pet smell to be evident once my floors were completed. So per my request my foundation was sealed in areas I requested this sealant be administered. Like KEELS found at any Home Depot/Lowes. (Foundation sealant)
Floor Preparation
Plastic Barrier laid down
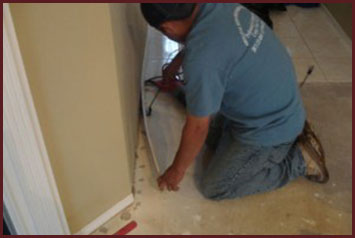
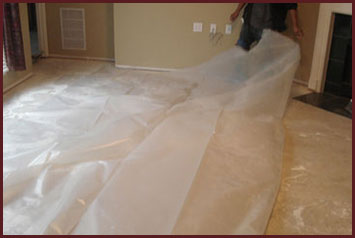 4. Next they cleaned the foundation prior to laying down a heavy gauge plastic sheet over the entire exposed foundation where they would next nail down the 5/8th’s thick plywood. This heavy duty plastic was applied as the first defense to possible foundation moisture seepage. Remember, moisture can seep through your foundation and can lead to issues with a wood floors installation. Moisture protection is a MUST when “building” the deck your hard wood scraped floors will rest on.
Sub-Floor Laid 5/8th’s thick plywood (sub-floor)
 5. Once covered in plastic, my crew cut on site sheets of 5/8th’s inch thick pine wood plywood. This was then fitted to match the exact outline of my foundation to be covered in scraped hardwood floors. The plywood sheets were actually nailed down to the cement slab with a high powered pneumatic nail gun.
Moisture Barrier Felt/ Last Moisture Barrier
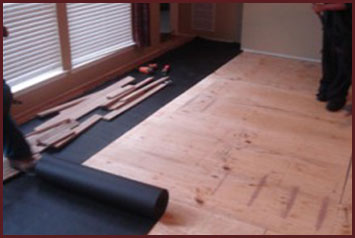 6. Then, one more moisture protecting layer was installed they called the felt. It was more or less the same material that is installed under your shingles. A thin black layer of “felt like” material was cut and nailed down to match the shape of the plywood. Now they were ready to install the individual hard wood oak planks I selected. Before we go any further let’s talk about wood selection for a moment!
Wood Selection
 Wood selection is something for you and your installer to discuss PRIOR to any of the installation process begins!There are several grades (qualities) of and types of wood planks one can chose from!
I elected to go with a Red Oak #2 grade of wood that was 3¼ inches wide and ¾ inches thick. A #2 grade is a lesser quality wood than a #1 which means it may have more imperfections/knot holes etc. in the wood planks.
This was a personal decision as I was advised that the #2 would offer a more rustic look once the floor was scraped and stained. THEY were right, I love it!! Plank width can vary between a 2 inch wide to a 5 plus inch wide plank. Most common is in the 3-4 inch width range. Cost of wood will have to be factored in to your quote. The wider planks of wood coupled with the higher grades of wood like will ALL factor in to your quote. I suggest you VIEW WOOD SAMPLES of various grades and widths and TYPES prior to selecting what you want. I would also suggest you tour a few new high end homes to see what’s out there before you commit to your selection. This helped me tremendously with my selection. Most wood is in the ¾ inch thickness category. WHY pay more for a #1 grade when they will soon scrape trash bags of wood shavings from what starts off as a smooth wood plank?? I actually took my installer to a new home where I wanted them to replicate exactly what I showed them. THEY DID! I am very happy with what they suggested which was what I already listed at the top of this section.
Wood Planks Laid Down on Plywood Sub/Floor
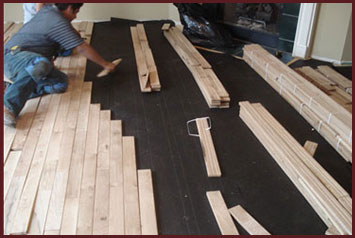
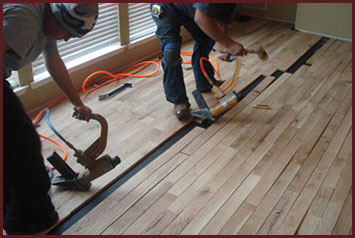 7. Wood planks of all various lengths were laid down to form the actual wood floor. The planks have slats in the sides to where they fit together like a jigsaw puzzle. EACH board has a place where a nail gun is able to shoot a nail into the plank thus nailing each wood plank into the plywood. Glue was used to affix planks against where base boards will be since the nail gun was unable to shoot the diagonal nail against the walls. That’s ok though! JUST NOT a full glue down application to the cement.
8. It is important to acclimate the wood to the climate conditions within your house. We suggest a week to ten days prior to installation. It is recommended to allow the wood planks (we deliver) to sit inside your home. It is also recommended to keep the temperature in your home between 70-76 degrees. There is no official number of days that are known to acclimate but we find 6-10 days works great. Some people will tell you that you must nail the floor down then come back 7-14 days later to scrape/stain etc. This is not necessary. As long as we pre-acclimate the wood planks prior to starting then this acclimation process is fine!
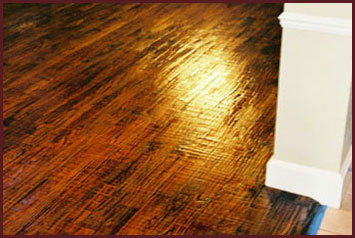
The Scraping Process
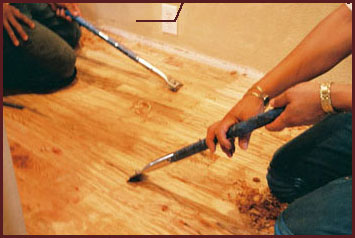 9. Get ready as your floor is about to be turned into its own one of a kind finish. Hand scraped floors are just that! Your installers will actually have small tools with semi concave blades that they scrape with.
If you desire the deep wavy look as I did then they will scrape across the wood planks and then with the grain of the wood which runs length wise.
This process is noisy and yet amazing and worthy of watching all at the same time. IT IS UP TO YOU to make sure your floors are scraped exactly the way you want as once they are stained there is NO MORE going back and “re-scraping”.
Five crew members spent hours on their hands and knees scraping both across and with the grain of the wood. Mine were first scraped across and which gives the floor a light look of waves/rows. Then they scraped with the grain (length wise) which really starts to “transform” what was once a smooth surfaced wood floor in to a work of art! You will end up with an entire floor of what looks like hamster cage wood shavings at some points several inches deep. I was amazed to oversee this scraping process!!
DON’T BE ALARMED, this is what you want if it is being done right. There are different levels of “waviness” you can obtain throughout the floor depending on if you want the look I did. Prior to staining, the “naked” wood floor will NOT show the true highlights that will be unleashed ONCE the stain and polyurethane coats are added on. Trust me, it is amazing to see what happens from here! Prior to staining it is IMPERATIVE that your installer SAND YOUR PRE-STAINED FLOOR. Don’t forget to make sure this is done, please read on!
Watch a video showing the scraping process in action.
Sanding and Crack Filling
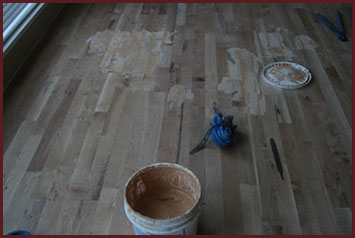 10. Sanding your entire wood surface is a must do. My crew went over the entire floor using a wood filler in areas where small cracks between the boards existed! Small cracks are normal.
The ‘crack filler” will aid in my quest to have a leak proof floor when done! In regards to sanding, some installers have “dustless” sanders some do not.
Dustless sanders are probably better than NON dustless sanders. However, do not fool yourself in to thinking that you will avoid wood dust from possibly coating other furniture/appliances in the areas being worked on or even those areas they are not working on!
I assumed it all to be just part of the installation process and with one simple cleaning when they were done: all is well. You may NOT take kindly to the layer of wood dust I witnessed BUT when it is all done, it was worth it. That dust meant they were doing things just as they were supposed to. PLEASE do not fault them if you are getting a good deal and you see the hard work they are doing for you! Just accept the fact that no matter what you cover or try to protect, you will have wood dust when they are done sanding.
 PURPOSE of sanding is to make sure that all small splinters/nicks from scraping are smoothed out prior to finishing your floor. You do NOT want socks and bare feet finding hidden splinters as they did just scrape every inch of your new hand scraped wood floor!
YOU be the judge as was I. I went over the entire floor making sure it was SMOOTH AND CLEANED PRIOR to the staining process. Your crew should sweep and clean the wood floor prior to administering the first coat of stain/polyurethane. You want that floor as dust free as possible and my guys seemed to get it pretty clean after sanding! Now let’s talk about the staining process and various shades to consider: By the way, my crew actually completed the entire scraping and the initial staining process in ONE day (about 600 square feet).
My crew had (FIVE) guys including the owner who scraped and stained all in one day! It was important to me that they did what they said they would do in the time line they set forth prior to the start of the project. They did complete everything exactly as they said they would “wood”!!
11. Prior to the staining process you should have already viewed a number of homes that have the stained scraped hard wood floors. Many reasons why I have already touched on! You can determine how “wavy” (rustic) you want your floors to look when done as well as get an idea for how the various stain colors will work in your house. There are THREE primary stains I was advised of: Antique brown, Coffee Brown and a mix of a Redwood/Antique as I recall. I elected to go with the Antique Brown again per their suggestion. I THOUGHT I would want the coffee brown (darkest almost appearing black) BUT in the end the floor was plenty dark. The wood showed great highlights and produced the very rustic look I was wanting to achieve. IF you go too dark, it can take away from and even hide many of the beauties you may want to see in your floor. When the final 3rd coat of polyurethane was applied I am glad I did NOT go any darker than I did! CALL is yours though. My installers were willing to stain several wood planks with the three types IF I wanted to see them before they proceeded to stain the entire floor.
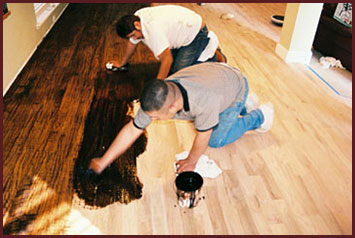
Let the Staining Begin
 12. Get ready to leave your house that night. Unless you are having some remote room done where you will not be gassed out of your normal living quarters just expect to have overnight arrangements made PRIOR to the stain going down. The stain and first coat of polyurethane was, to be blunt, overpowering in my house. Both me and my pets had to evacuate until the next day. Just have a bag packed as there was no way I could stay there the first night with the combined fumes from the stain and the polyurethane. NOW we are almost done.
Oil poly is great, but most new floors and refinished floors opt to go with water poly vs. oil. Water poly dries in 2-3 hours vs. oil taking 8-15 hours. Water poly has less fumes than oil but most importantly water poly is more durable than oil. Please feel free to discuss options pros/cons with us! Water poly does cost us slightly more than oil so some additional fees may apply TBD.
Polyurethane: Flat, Gloss or Semi Gloss?
 13. Final coats of polyurethane can be administered to your hand scraped wood floors as flat, gloss or semi gloss. Best way to describe this is as follows: Look at your white walls in your house, they most likely are painted in a FLAT white (non-shiny paint).
NOW, look at your base boards or door frames and notice that they might have a SHINY appearance. That can be either a GLOSS or SEMI GLOSS paint. Now look at your walls especially if they are white. They are most likely painted in a non shiny, flat paint.
Flat = NON shiny
Semi Gloss = in-between a shiny and flat look
Gloss = shiny appearance.
PET OWNERS BEWARE:
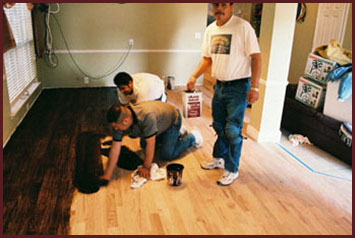
 It was strongly suggested that pet owners use a flat finish and not a gloss/semi-gloss as pet claws can scratch your finish! Although I initially wanted a GLOSS or SEMI-Gloss finish, I was advised not to and am glad I took their suggestions! My hand scraped wood floors were covered in three separate applications of a flat based polyurethane. Thus far, it would appear as though my hand scraped wood floors will be well protected against most any spills!
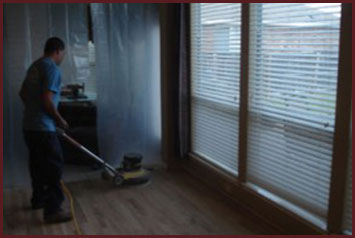
Two coats of polyurethane is standard protocol. I requested that three coats be put down and am happy to report that they are shiny enough as is!
In-between the three separate coats it is crucial to have the floors lightly buffed to SMOOTH OUT any rough spots. This will give your floor a smooth laminar feeling yet still retain the beauty of a hand scraped wood floor! Now it is time to re-install the base boards!
Base Boards
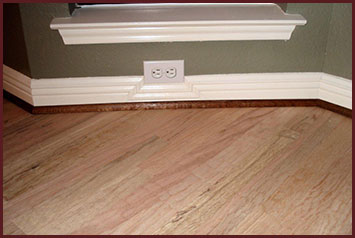 14. You can ask your contractor prior to starting your floor what they will charge you to re-install your old/new base boards. My crew cut and re-installed ALL new base boards once again to my own satisfaction!
I elected to buy my own. Thicker molding stands a better chance of survival once removed and then re-installed!
15. I had to hire an outside contractor to re-paint and then caulk the base boards. That cost me under $200 which was nothing based on the work they did.
Conclusion
 In conclusion, I am very pleased with what my crew did for me. I hope the “tutorial” on selecting a hand scraped wood floor vendor was/is helpful in aiding in your decision making process.I am more than willing to have you visit my home to see the finished product if interested. I can not think of one thing I would have changed throughout my vendor selection. Good luck in making in your decision. We will be happy to assist with further questions or flooring request.
Watch the story behind DFW Custom Wood Floors, and
how we take pride in achieving excellence with each and every customer.
Hardwood Floor Installation – Step-By-Step
A Great Crew Means a Job Well Done
Why I Started the Company
What I Like About This Business
A No Pressure Approach
How We’re Different
Pre-Acclimating the Wood
Water-Based Polyurethane Means Next Day Move-In
Matching Your Existing Hardwood Floors
Need help finding the
perfect DFW Custom Wood Floor
style & space?
Talk with us today about your project.
We make it easy to browse, design, select
and plan your new floors.
Have questions about our flooring? We’re happy to help.